How to Prepare Your Property for a Real Estate Photo Shoot
A room-by-room guide from our photographers on what actually makes a difference — and what not to waste time on — when getting a property ready for its listing shoot.

The basics that make the biggest difference
We've shot thousands of properties. The ones that photograph best — regardless of price point — have one thing in common: the seller (or agent) put in 2–3 hours of focused preparation before we arrived. The ones that underperform almost always had something avoidable in the frame.
Here is what we've learned actually moves the needle, room by room.
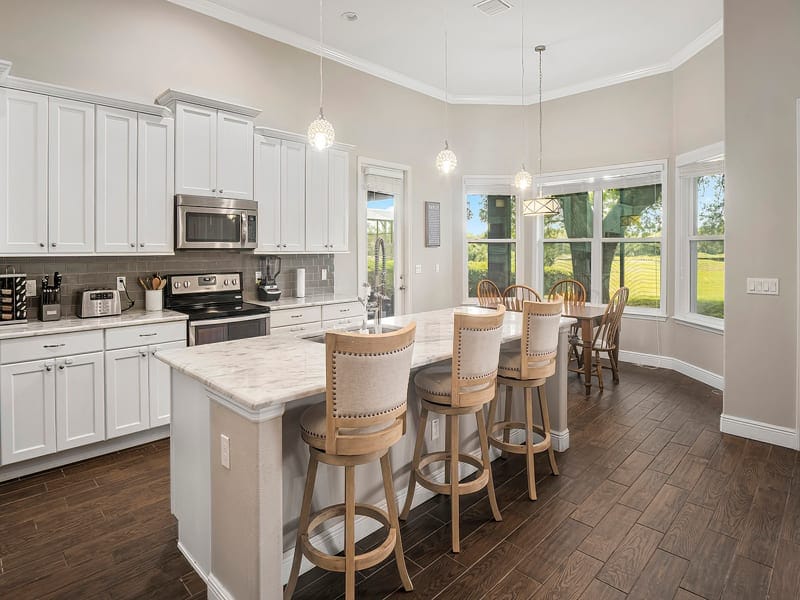
Kitchen
Clear every countertop. Move the coffee maker, toaster, knife block, dish rack, fruit bowl — all of it. Leave the range hood if it's built-in and attractive. Put one or two deliberate items back: a cookbook, a vase with a single stem, a bowl of lemons. Less is always more in a kitchen photo.
Bathrooms
Remove all personal care products from counters, shower, and tub edges. Put out fresh white towels, folded neatly. Remove bathroom rugs if they're worn or dated — bare tile usually photographs cleaner. Close the toilet lid. Leave a single decorative item on the counter if the counter is attractive.
Living spaces
Remove family photos, kids' art on the refrigerator, and personal memorabilia — buyers need to picture themselves in the space, not the current owners. Fluff sofa cushions. Clear coffee table surfaces to one deliberate grouping. Hide visible cords and power strips. Remove pet items — beds, bowls, toys.
Bedrooms
Make all beds with a crisp, unwrinkled duvet or comforter. Remove laundry baskets, visible clothing, and anything on the floor. Nightstand surfaces should have at most a lamp and one small item. Master suites: this room sells the dream — spend extra time here.
Exterior
Move all vehicles out of the driveway and away from the front. Put away hoses, trash bins, garden tools, and any outdoor clutter. Mow the lawn if it needs it. If the front door is faded, a fresh coat of paint costs $20 and shows up clearly in the hero photo. Sweep the walkway and driveway.
Lighting
Turn on every light in the house — ceiling fixtures, lamps, under-cabinet lighting, closet lights. Remove any burned-out bulbs before we arrive. Open all interior blinds and curtains unless the view outside is unattractive. Consistent, warm light throughout the home photographs much better than a mix of bright and dark rooms.
Once you've prepared the property, you're ready to book. Learn more about why professional photography impacts sale outcomes, or go directly to our real estate photography Orlando service page to see packages and pricing.
“I share this prep guide with sellers 48 hours before every shoot now. The difference in readiness when the photographer arrives is enormous.”
“Followed the lighting section specifically — every fixture on, all blinds open. Our kitchen shots turned out better than I thought the space could look.”
Common questions answered.
Most sellers need 1–3 hours to properly declutter and stage. Start with kitchens and bathrooms, which are the most critical rooms. Work outward from there. Our pre-shoot checklist covers everything room by room.
Open, with one exception: if the view outside is unattractive (a neighbor's wall, a power line, a parking lot), close them and rely on interior lighting instead. For attractive views — a pool, a lake, a garden — always open the blinds and let natural light and the view work together.
Yes. The best exterior shots happen during the "golden hour" — the hour after sunrise or before sunset — when light is warm and directional. Midday sun creates harsh shadows and flat, washed-out facades. We schedule exterior timing when possible, or shoot overcast for soft even light when golden hour isn't available.
Yes, always. Cars block the facade, reduce perceived driveway size, and date the photo. Park them down the street before the photographer arrives. This is one of the easiest ways to improve listing photos with zero cost.
Not necessarily. Decluttering and cleaning go further than most people expect. A professional stager is valuable for vacant properties or when the furniture layout is poor, but for occupied homes in reasonable condition, focused decluttering and our pre-shoot checklist usually gets the result you need.
Ready to book your shoot?
Same-day and next-day slots often available. Book online or call us directly.